Discover the File Server Resource Manager (FSRM) for Windows
The File Server Resource Manager (FSRM) has been around for quite a while but seems to be an underutilized feature on a Windows Server. The FSRM helps system administrators with anything related to managing files on file servers.
With FSRM, you can put a size limit on a directory, filter the files users share, and more.
Stick around and discover the benefits of setting up the File Server Resource Manager and how to use its features to your advantage!
Prerequisites
This tutorial will be a hands-on demonstration. This tutorial assumes you already have a working domain controller, file server, and network-shared folder. You must also have a domain administrator account to set up FSRM.
Installing File Server Resource Manager on Windows Server
Like most roles and features, FSRM does not come pre-installed on a Windows Server. You need to install FSRM yourself.
In real-world use cases, FSRM and File server roles and features are installed together on a dedicated Windows Server. But if you don’t have a dedicated server, you can install the file server and FSRM roles onto your domain controller as part of a testing environment.
1. Log in using your domain administrator account to your file server.
2. Click Manage → Add roles and features.
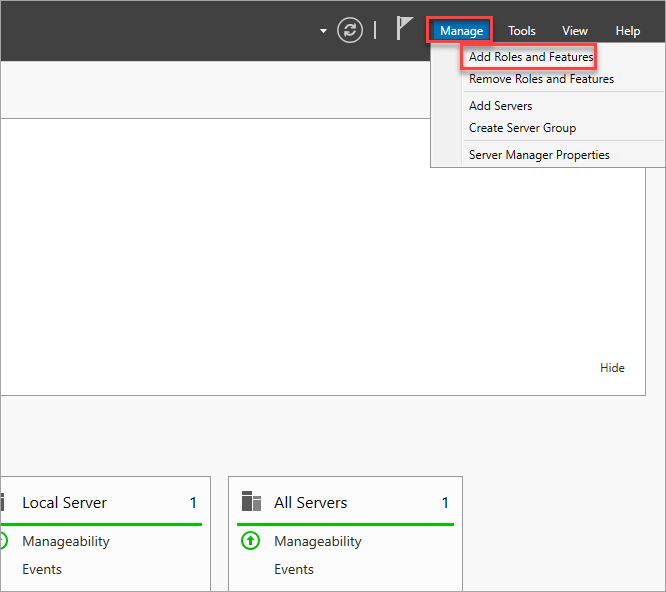
Installing FSRM through Add Roles and Features Wizard
3. Click Next on the Before you begin tab.
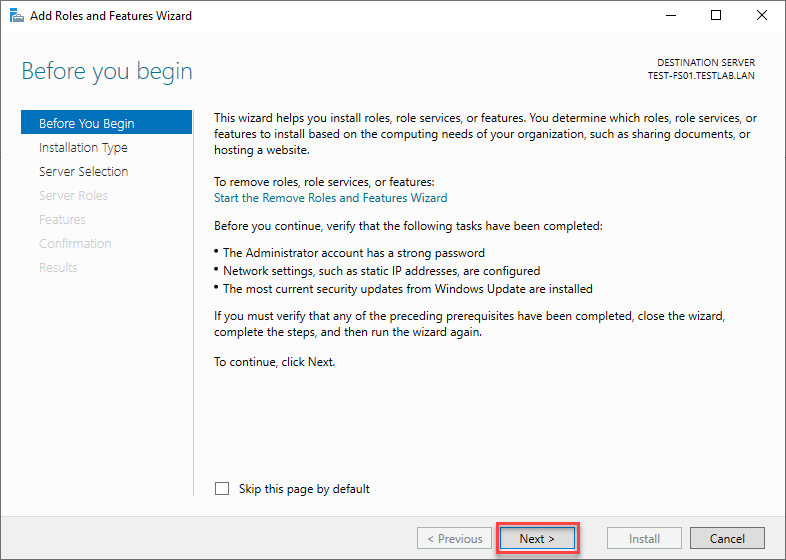
Clicking Next on the Before you begin tab
4. Select Role-based or feature-based installation and click Next.
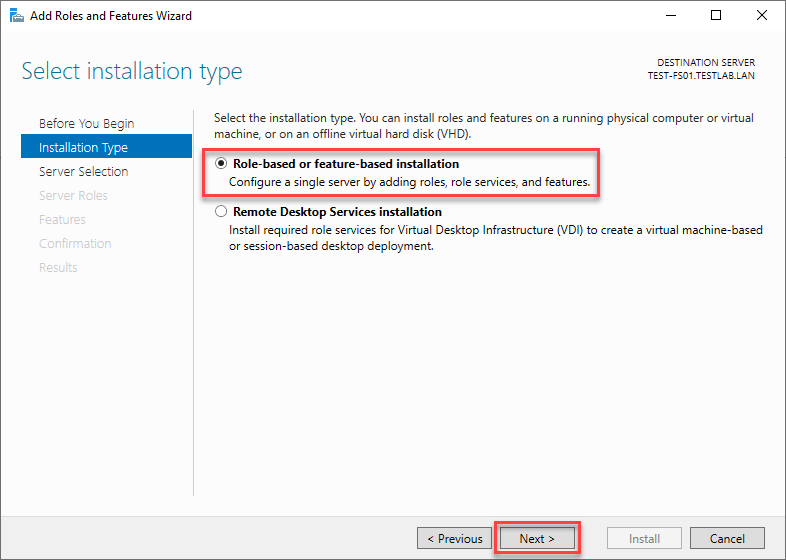
Choosing Role-based or feature-based installation
5. Since installing on the local server, keep the default values on the Server Selection tab and click Next.
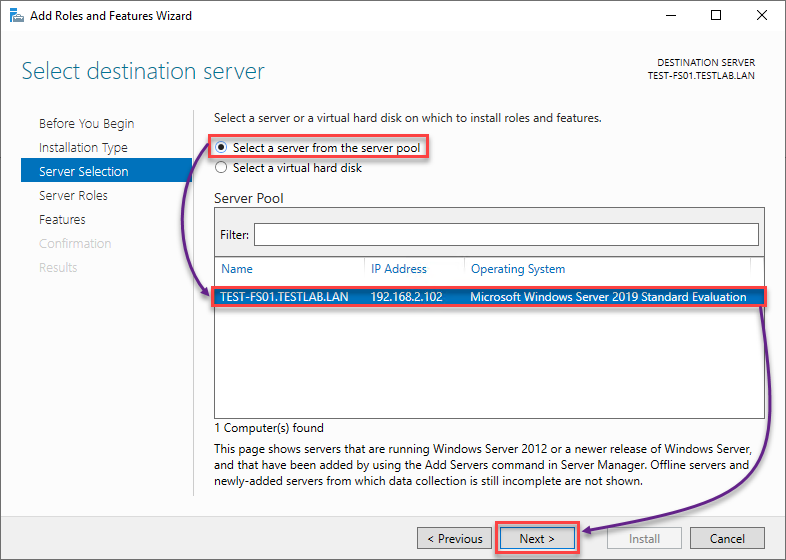
Selecting the destination server
6. On the Select server roles tab, expand File and Storage Services. Expand File and iSCSI Services, and tick File Server Resource Manager.
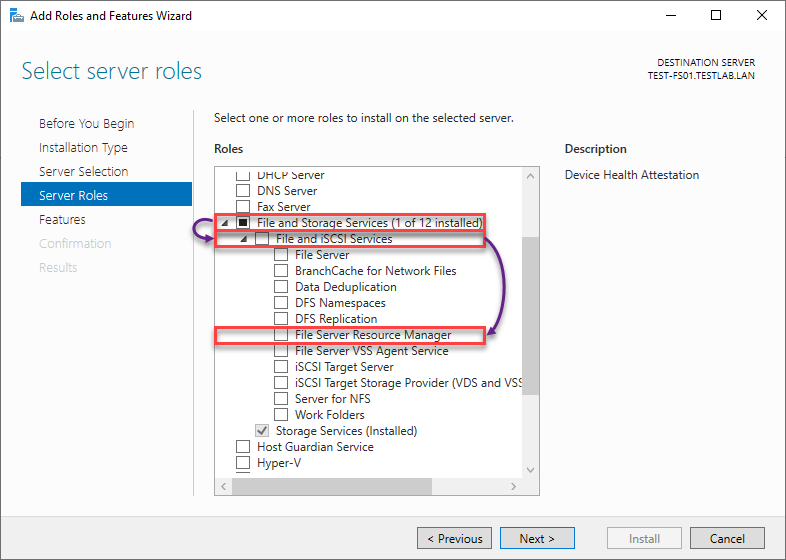
Selecting FSRM
7. Click Add Features on the popup window.
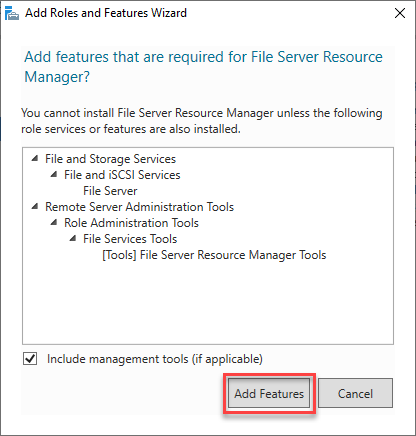
Adding FSRM features
8. The wizard will tick the File Server and File Server Resource Manager after you click Add Features. The wizard will disable the File Server option if you have already installed it.
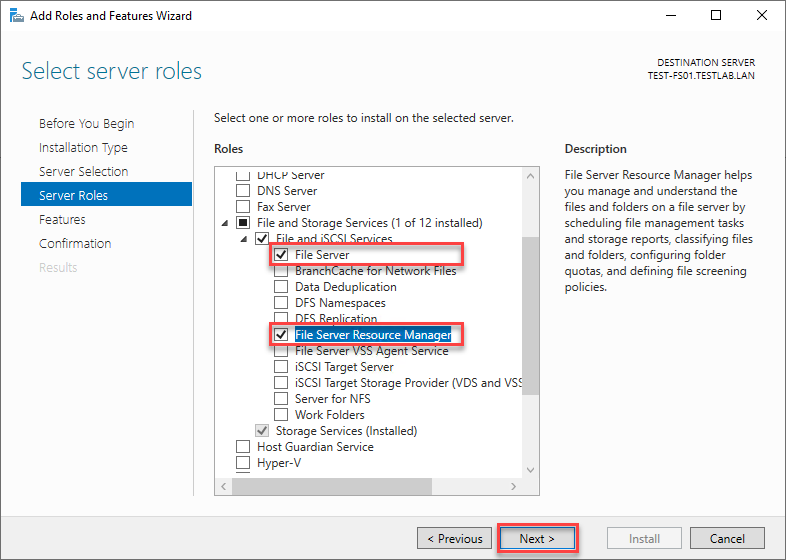
Navigation to the Features tab
9. Keep the default selected values on the Select features tab. Click Next to advance to the Confirmation tab.
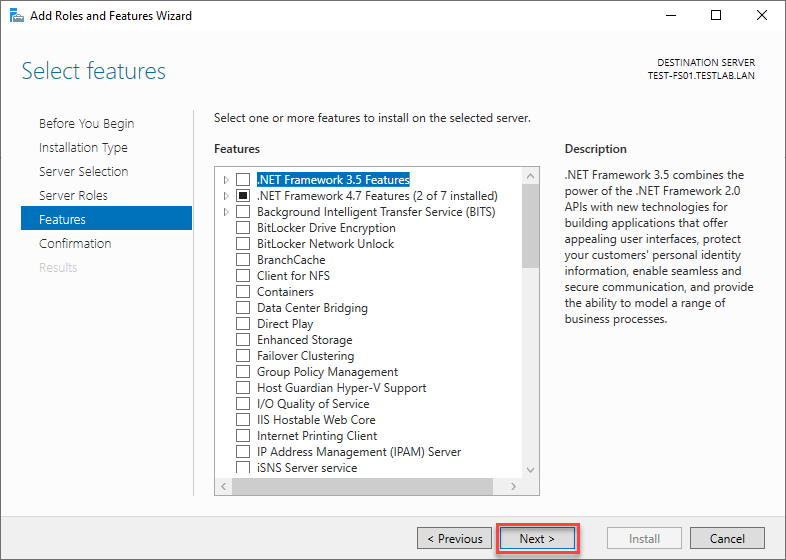
Navigating to the Confirmation tab
10. On the Confirmation tab, confirm that the File Server Resource Manager is part of the installation. Click Install.
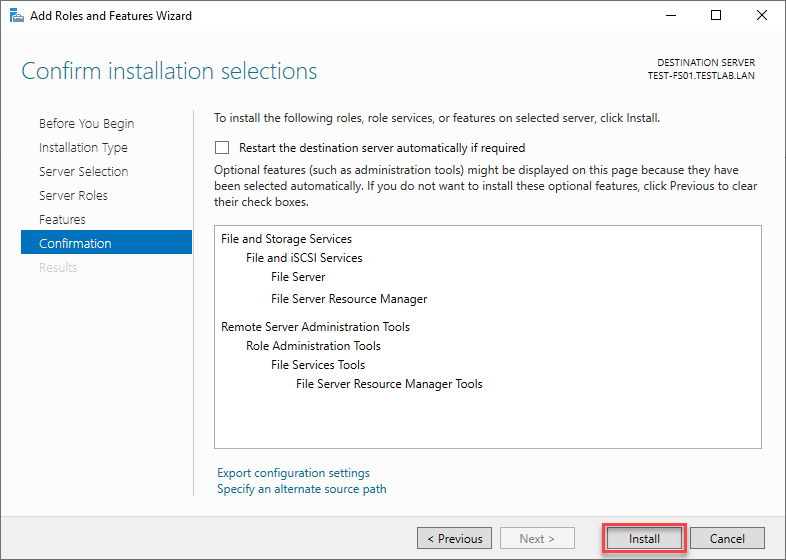
File Server Resource Manager
11. Within a few minutes, the installation will be complete. Click Close.
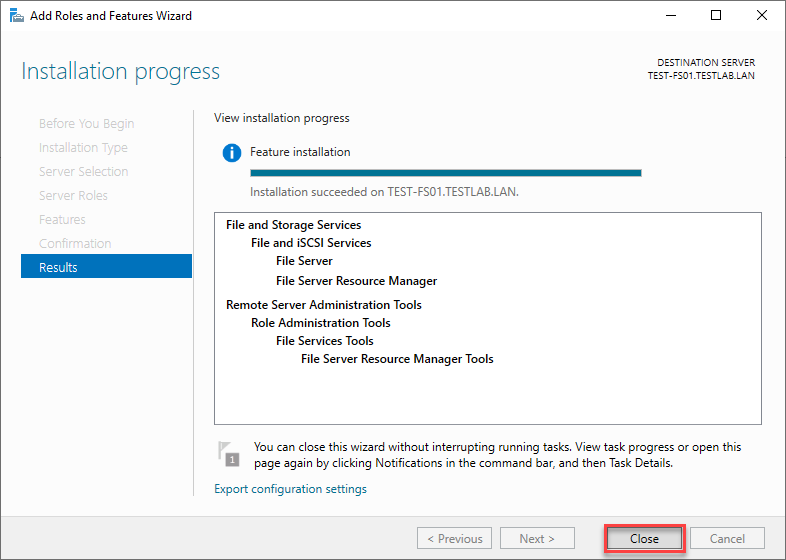
Closing the wizard
In this instance, the installation did not require restarting the server.
Accessing File Server Resource Manager
After installing FSRM and restarting the destination server, you can pull up FSRM from the Server Manager’s Tools menu.
1. Click Tools on the Server Manager → File Server Resource Manager.
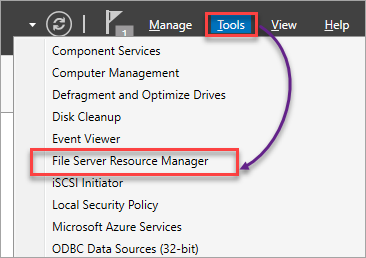
Opening FSRM
2. FSRM has five primary nodes that you can configure:
-
Quota Management – To create user file size quotas to conserve storage space.
-
File Screening Management – Create filters that allow or deny users to save specific file types.
-
Storage Report Management – To Schedule report tasks and generate reports in real-time.
-
Classification Management – To categorize files depending on their classification property type.
-
File Management Tasks – Create tasks to automate file management, such as creating expiration tasks.
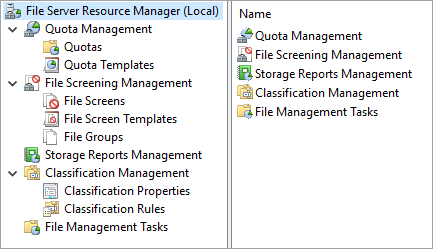
Viewing FSRM
Tweaking File Server Resource Manager Options
Before configuring any nodes of FSRM, there are some configurations you need to perform in the FSRM options. The following settings will be helpful in your implementation of FSRM. Feel free to navigate all the other tabs not tackled here.
1. To configure FSRM options, click File Server Resource Manager (Local) → right-click File Server Resource Manager (Local), → click Configure Options.
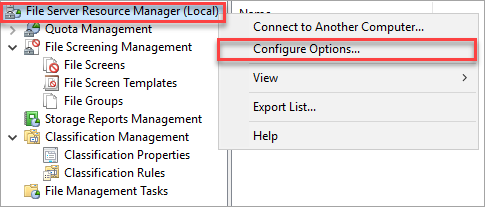
Configuring FSRM Options
2. The first tab to appear under File Server Resource Manager Options is Email Notifications. Enter your SMTP server address here. This article does not have an email server for this demonstration. To set up an email server, consider reading the related guide below.
Related:Getting Started with hMailServer: Installation and Configuration
3. Next, click the File Screen Audit tab. Tick the Record file screening activity in auditing database to record file screening activity audits.
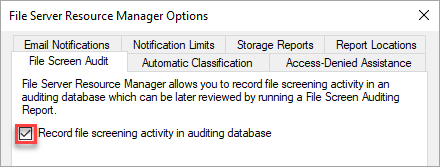
Recording in auditing database
4. Navigate to Report Locations to see the report paths. You can keep or change these locations as you wish. Click OK to save your changes.
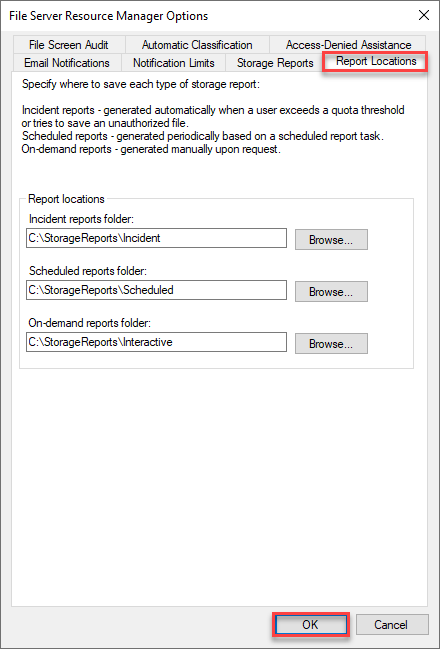
Saving changes to FSRM options
Configuring Quota Management
Quota Management allows you to create quotas for shared drives and folders. Quota Management has two subcomponents: Quotas and Quota Templates.
Creating a Quota Template and a Quota
You can create a quota to set a data limit to a shared folder. Aside from limiting data or volume usage, a quota can send threshold notifications via email, event log, report, and run a script or command.
1. Expand Quota Management → click Quota Templates → right click Quota Templates → click Create Quota Template.
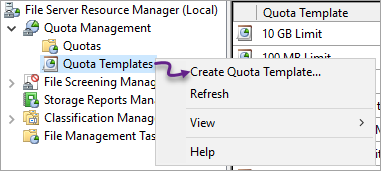
Creating a quota template
2. Input the following details:
Template name: 4 GB Limit
Space Limit: 4 GB
Click Hard quota → Click Add in the Notification thresholds part.
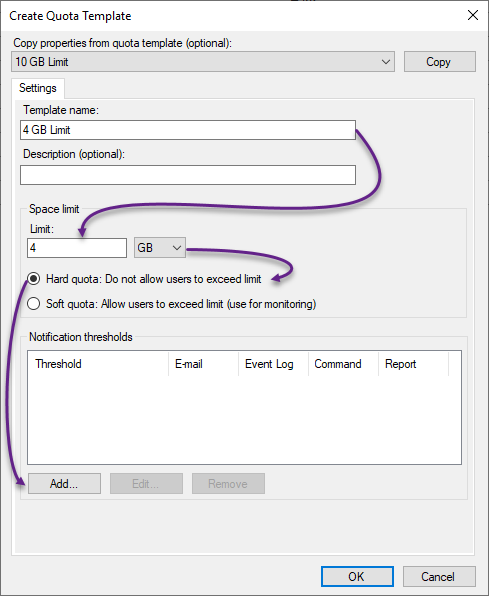
Defining quota limit
3. Keep 85% usage to generate a notification. Click Event Log → tick Send warning to event log → click OK.
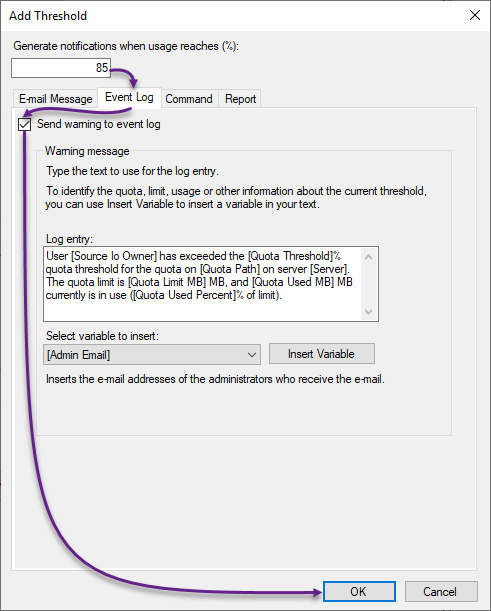
Setting to send a warning to the event log
4. Click OK to finish creating the quota template.
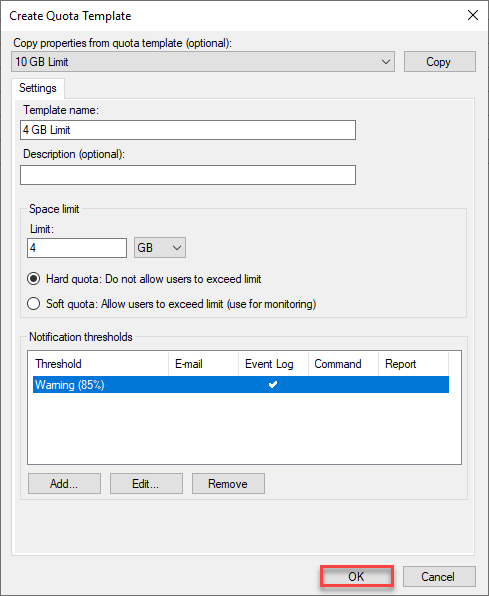
creating the quota template
5. Click Quotas on FSRM→ right click Quotas → select Create Quota to create a quota.
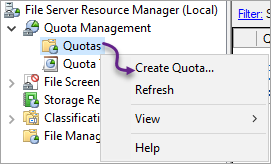
Creating a quota
6. Specify the quota path. Click Create quota on path→ click Derive properties from this quota template. Select 4 GB Limit. Click OK to finish creating the quota.
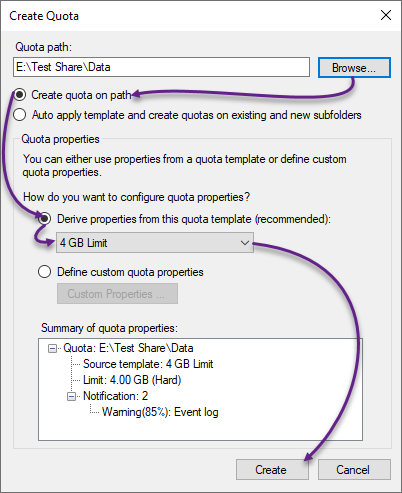
Selecting quota properties
Testing the Quota
You can test your quota to generate notification/s and let users know they can’t exceed the size limit. First, trigger a notification by adding files to the folder to reach the threshold. And second, add more files that exceed the size limit warning the user.
1. Navigate to your quota path in File Explorer and add files greater than or equal to 85% but less than 100% of the 4 GB quota.

Triggering an event log warning
Related:Enabling Hyper-V USB passthrough to Access a USB Storage
2. To see the event log, click Tools on Server Manager → click Event Viewer.
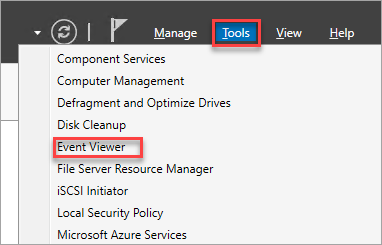
Opening Event Viewer
3. Expand Custom Views → click Administrative Events → click the most recent warning from the source SRMSVC. The Event Viewer will display the event log text and other details below. Close the event viewer when done.
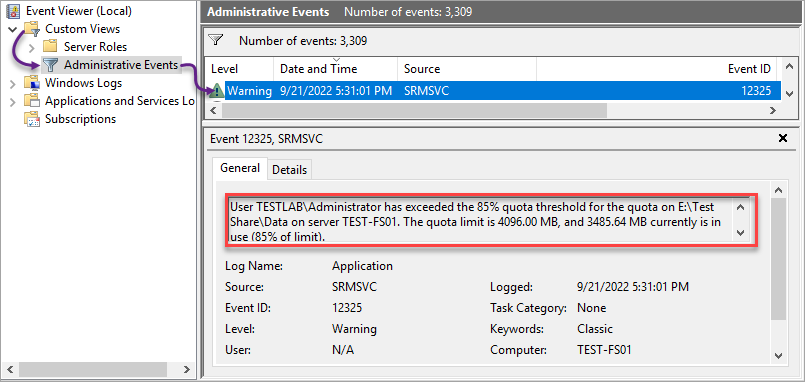
Viewing the threshold warning
4. Navigate to your quota path in File Explorer again and add more files to the shared folder. When you’re about to exceed the quota limit, you’ll get a prompt saying, “There is not enough space on…”
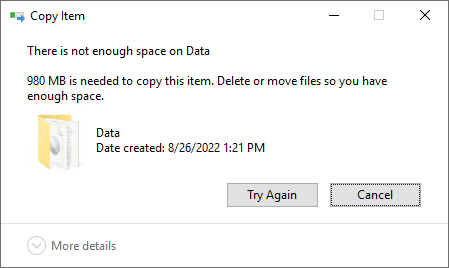
Exceeding quota limit
Setting Up File Screening
File screening is another excellent feature of FSRM; it can help define which files are allowed and which are not. File screening ensures users only upload appropriate and approved files on a shared drive or folder.
Creating a File Screen
A file screen acts as a filter for which files the users can upload to the shared folder. A file screen either allows or denies users to add files upload. In this example, you will create a file screen template and a file screen to block compressed files.
1. Expand File Screening Management on FSRM → click File Screen Templates → right-click File Screen Templates → click Create File Screen Template.
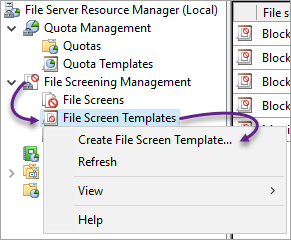
Creating a file screen template
2. In the Template name, type Block Compressed Files. Click Active screening → tick Compressed Files from the file groups to block.
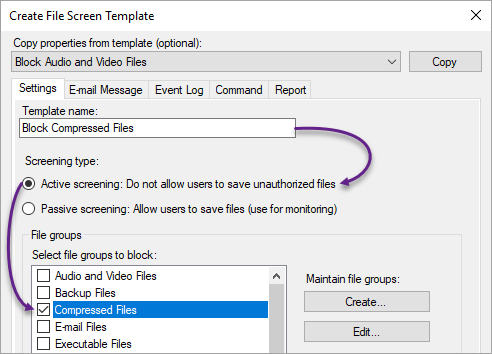
Choosing to block compressed files
3. Click Event Log → tick Send warning to event log.
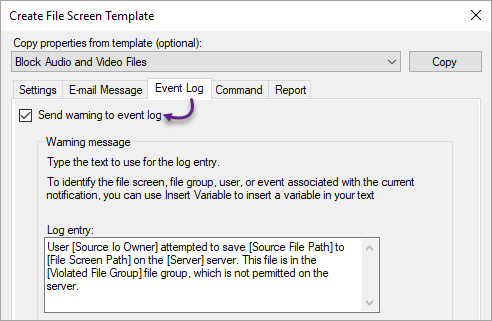
Sending file screen warning to the event log
4. Click Report → tick Generate reports → tick File Screen Audit → click OK.
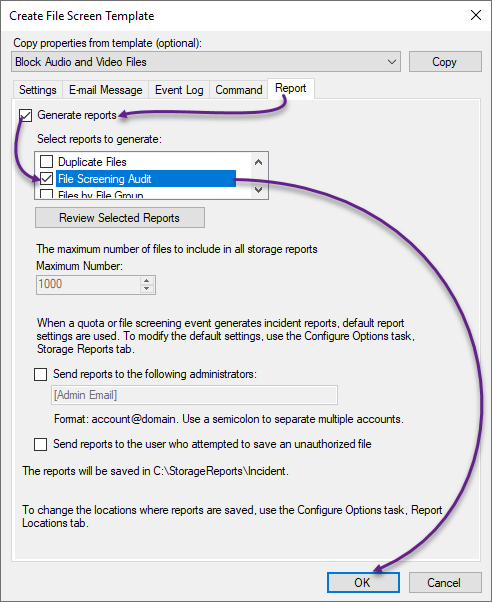
Choosing file screen audit report
5. Click File Screens Management → right-click File Screens → click Create File Screen.
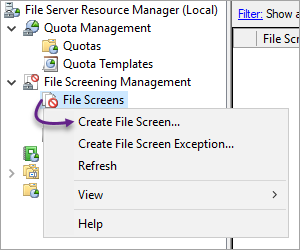
Creating a file screen
6. Specify the file screen path → click Derive properties from this file screen template → select Block Compressed Files → click Create.
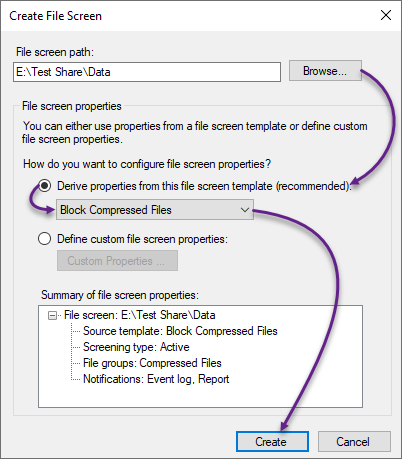
Choosing to block compressed files
Testing the File Screen
To test the file screen, try to save a compressed file to the file screen path to trigger a warning.
Navigate to the file screen path and add a compressed file. You should get a message like the one below.
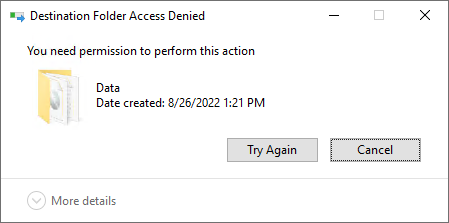
Access denied
Open the Event Viewer and click the most recent warning from SRMSVC. The event log text and other details are below.
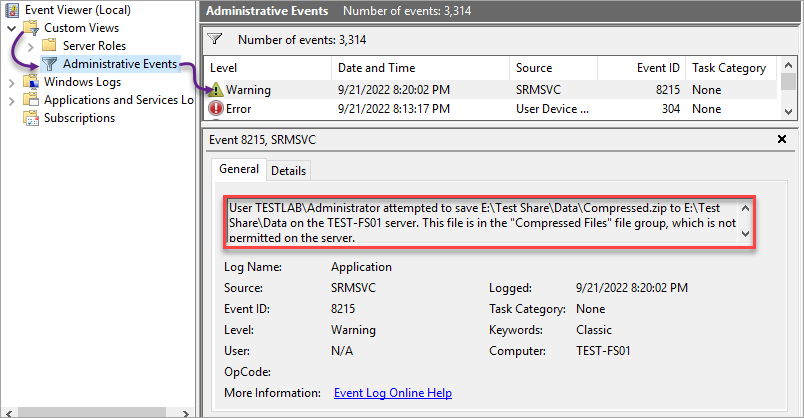
Viewing the file screen warning in the event viewer
The default location of the generated file screening audit report is C:\StorageReports\Incident.
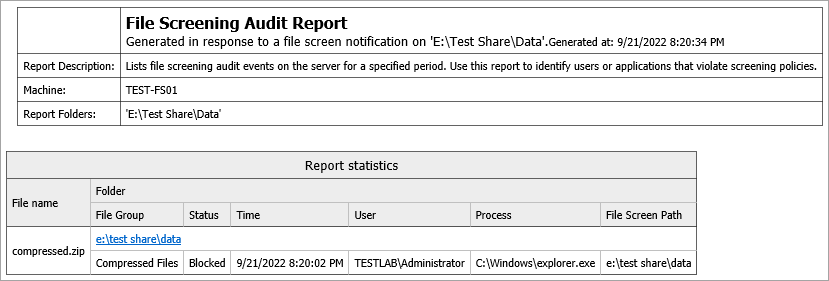
Viewing file screening audit report
Related:How To Secure Your Operating System via Windows 10 AppLocker
Managing Storage Reports
Storage Reports Management helps you generate reports in real-time, schedule a weekly or monthly report task, and add or remove reports for a report task. In this example, you will learn to schedule a report task.
1. Click Storage Reports Management → right-click Storage Reports Management → click Schedule a New Report Task.
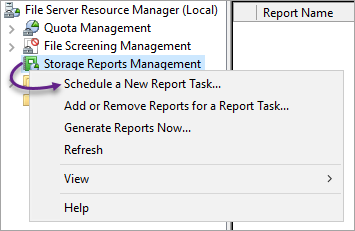
Creating a report task
2. Type File Screen and Quota Usage in the Report Name. Tick File Screening Audit and Quota Usage under reports to generate.
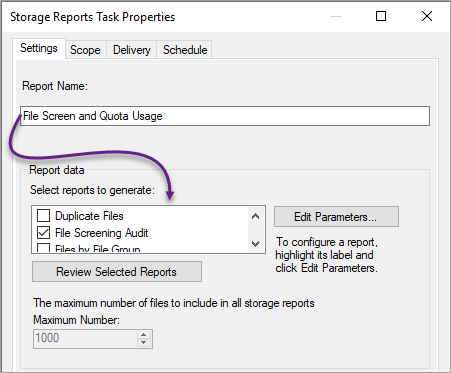
Naming the storage reports task
3. Click the Scope tab. Click Add and specify the folder to add to the task’s scope.
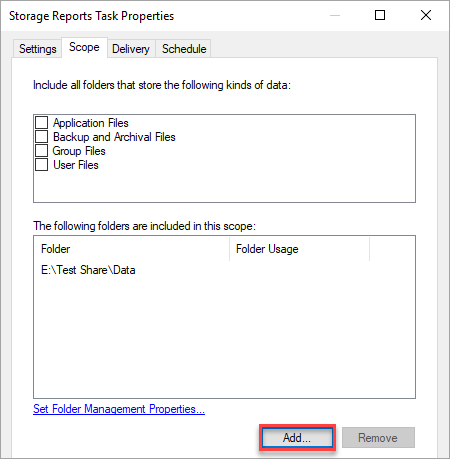
Adding folder to the scope
4. Click the Schedule tab. Set the time and frequency for automatic storage reports, and click OK. The default location for scheduled reports is C:\StorageReports\Scheduled.
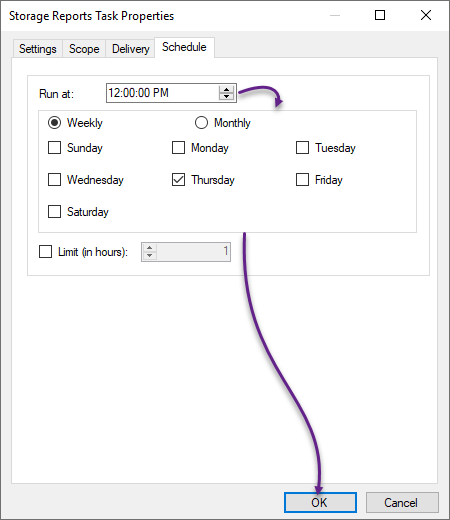
Scheduling the storage reports task
5. Right click the task name → click Run Report Task Now to run the report task on demand.
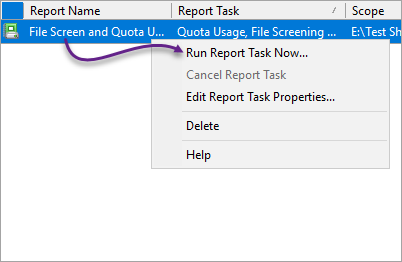
Running the report task on demand
6. Click the Wait to display the generated option, and click OK.
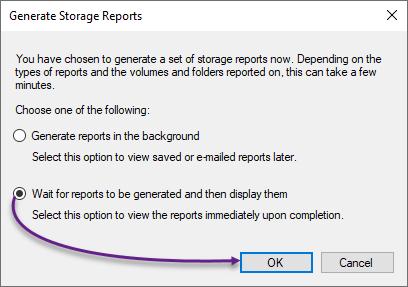
Waiting to display the reports
Below is an example of storage reports generated on demand.
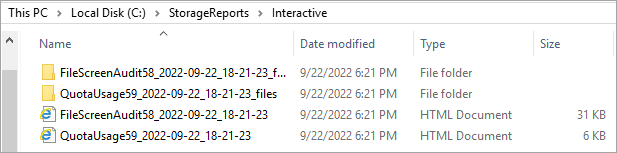
Viewing interactive reports
Working on Classification Management
Classification properties and rules help categorize files within a specified directory. You will create a yes or no classification property, classification rule, and an additional parameter for this demonstration.
Creating Classification Properties
Classification properties help assign values to files within a designated folder or location. There are different classification property types you can choose from depending on your needs.
Expand the Classification Management. Right click Classification Properties → click Create Local Property.
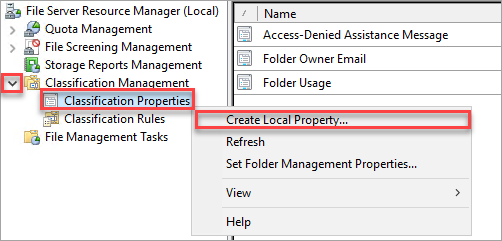
Creating a local property
Type the name of your new classification property, add a description, select Yes/No property type, and click OK.
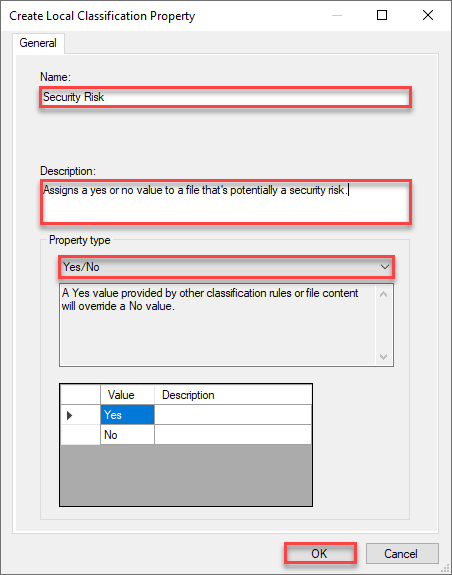
Choosing a property type
Creating Classification Rules
Create a classification rule to set the value for a single classification property. Here, you learn to create a classification rule as a content classifier with a parameter to look for the word password within files.
1. Create two text files in the directory of files to classify, and one must contain the word password.
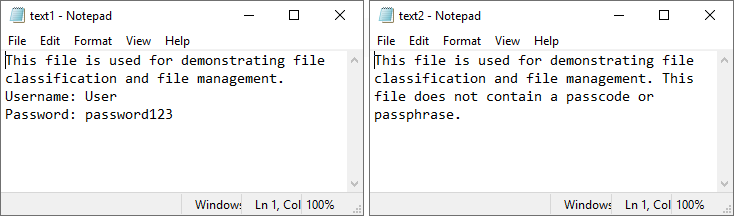
Creating text files
2. Click Classification Rules → right-click Classification Rules → click Create Classification Rule.
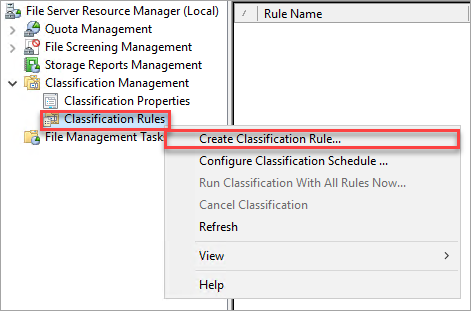
Creating a classification rule
3. Type the rule name and description on the General tab and tick Enabled.
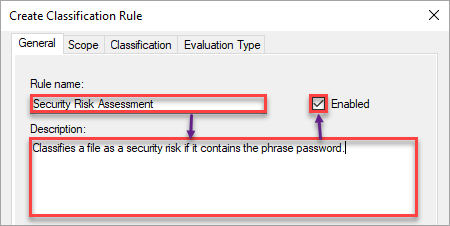
Naming the rule
4. Click the Scope tab. Click Add and specify the folder or folders you want to include in the scope.
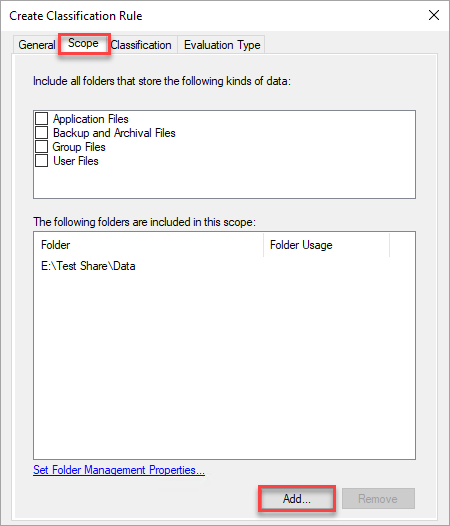
Adding scope
5. Click the Classification tab and set the following fields.
-
Classification method: Folder Classifier
-
Property to assign to files: your yes/no rule.
-
Specify a value: Yes.
Click Configure.
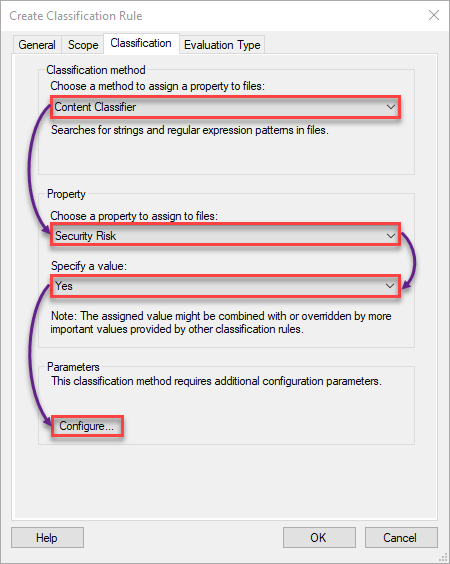
Choosing classification options
6. Type password under Expression. Click OK.
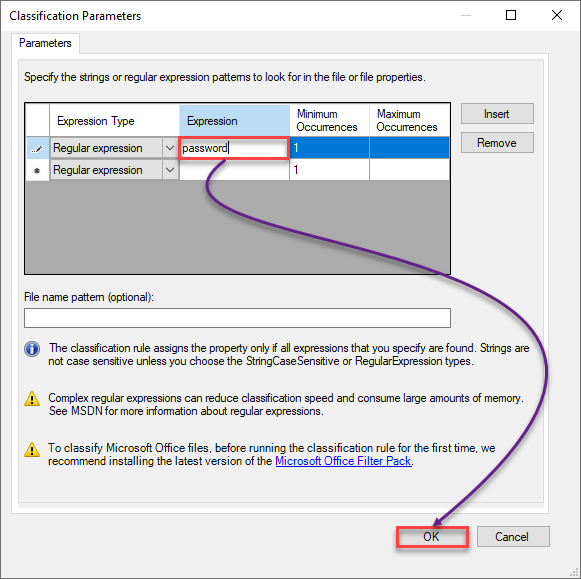
Adding a parameter
7. Right click Classification Rules → click Run Classification With All Rules Now.
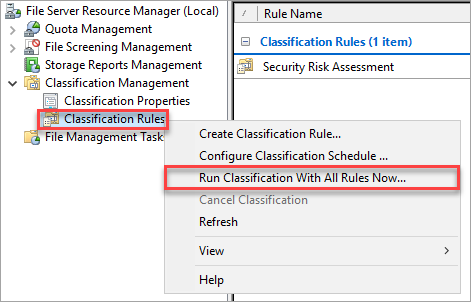
Running Classification
8. Click Wait for classification to complete and click OK.
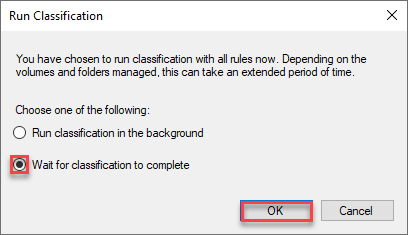
Waiting to complete classification
After running classification, the reports will open in a browser.
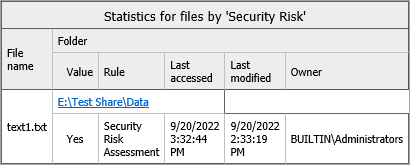
Statistics report
9. Open File Explorer, right-click one of the files in the reports → click Properties, → click Classification to verify classification. Click OK to close the file properties.
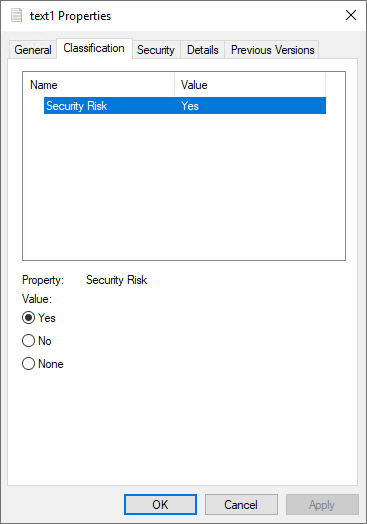
Verifying classification
Creating File Management Tasks
Manual file management is prone to user error and time-consuming. What if you have a lot of files to process? Automate file management tasks by schedule or on demand. Here, you’ll learn to create a file management task based on the classification property and rule you made earlier.
1. Click File Management Tasks → right-click File Management Tasks → click Create File Management Task.
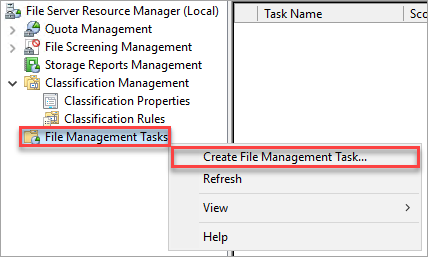
Creating a file management task
2. Type the task name and description on the tick Enabled.
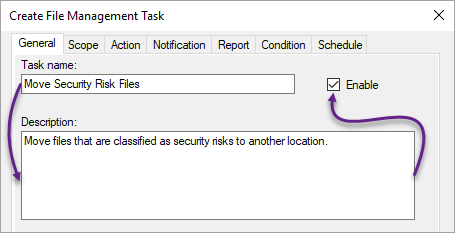
Naming the task
3. Click the Scope tab → click Add to add a folder or folders to include in the scope.
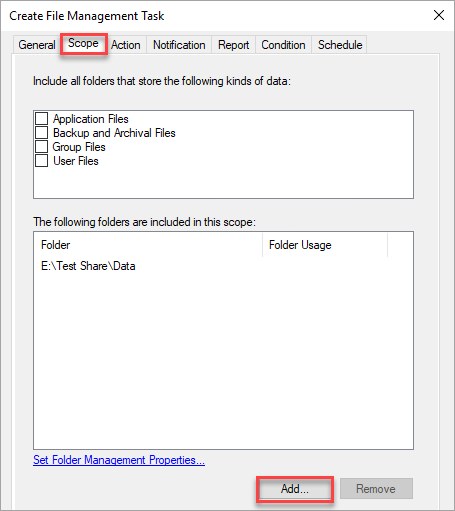
Adding task scope
4. Click the Action tab and choose File expiration as the action type. Specify the expiration directory.
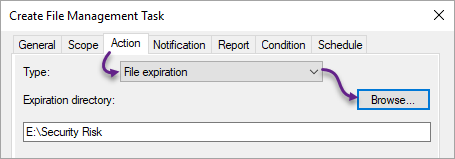
Choosing file expiration
5. Click the Condition tab → click Add under property conditions and choose the following values:
-
Property: your yes/no property.
-
Operator: Equal.
-
Value: Yes.
Click OK.
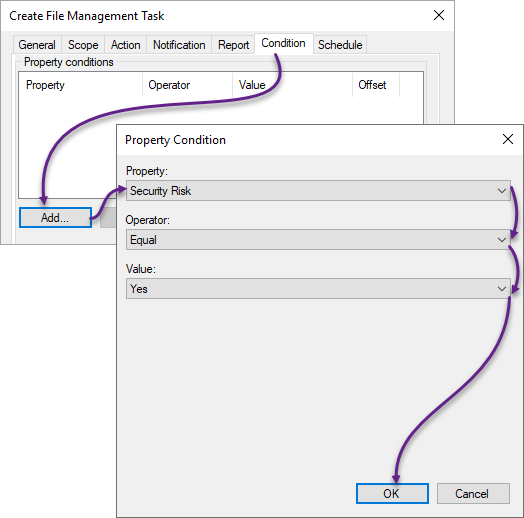
Setting the condition
6. Click the Schedule tab, set the time, choose how often this task runs, and click OK. In this example, the schedule is 5:00 PM every Friday.
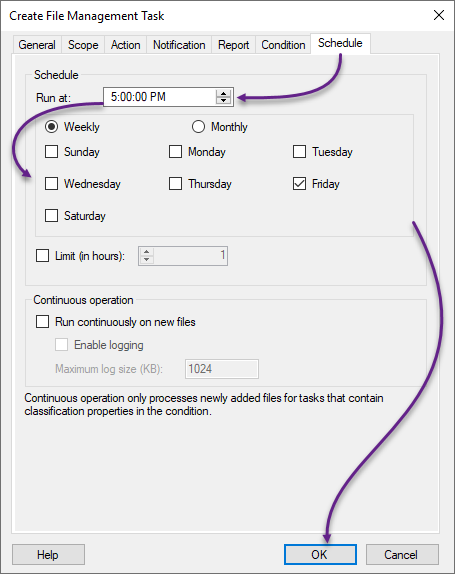
Scheduling the task
7. Right click the File Management Tasks node → click Run File Management Task Now → click Wait for the task to complete, → click OK. This step is for testing if the task works.
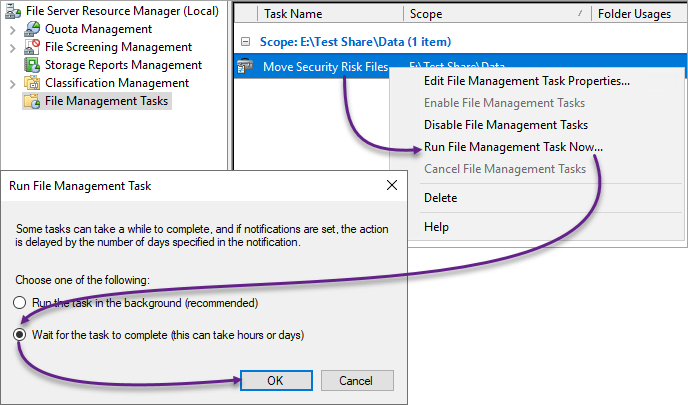
Running the task on demand
8. On the top part of the report, click on the expiration directory to confirm the text file that contains the word password is there.
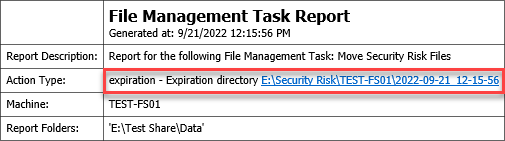
The File Management Task Report
Conclusion
Thank you for sticking around. You have learned how File Server Resource Manager helps keep file management more effortless. FSRM also acts as a safety feature for blocking unapproved and potentially harmful files from being uploaded to the file server.
The scenarios and what you learned in this tutorial only covered the basics of File Server Resource Manager. Keep learning, and remember to have fun while you’re at it!